Monday, November 27, 2023

The Crispy Chronicles: A Journey to Perfect Bagnet


Bagnet, the Ilocano pride, is more than just a dish; it is a testament to the rich culinary tradition of the Philippines. Marrying the simplicity of ingredients with the complexity of flavors, we shall embark on a delightful journey of tender textures and crunchy finishes.

1: Introduction to the Irresistible Bagnet

The conundrum of cooking bagnet lies not in the ingredients but in the technique. With the right guidance, turning 1 kg of pork shank into a delectable treat becomes an attainable culinary feat. The seduction starts with the aroma and concludes with a crunch that echoes through the soul of every food lover.

2: The Ingredients Symphony

To commence, let's unveil the ensemble: 1 kg of princely pork shank is the protagonist, with 4 cups of vegetable oil for the deep-frying ballet. A dressing of 0.5 cup vinegar, 4 cloves of garlic, and 4 pcs shallots accompany, while the zing of 2 pcs red chili adds spice to the plot. Complement this with 2 tbsp of bagoong isda (fermented fish paste), and 4 pcs of luscious tomatoes packed in juice, no salt added.

3: The Preliminary Rituals

Before we proceed, a thorough preparation is vital. Begin by cleaning the pork shank, ensuring the removal of hairs and impurities. Massage the meat with affection, using a mixture of garlic and shallots, crushed and minced to release their flavorful oils. This process will not only tenderize the pork but also infuse it with a robust character.

4: The Marinating Dance

Marination is not a step to bypass. It is, instead, an overnight waltz in the refrigerator where the pork commingles with vinegar, seasoning it with personality and tang. As the hours pass, the vinegar works its magic, tenderizing the shank and meshing the flavors deeply.

5: The Initial Sizzle

Upon completion of the marination, we introduce the pork to a calming boil, transforming it from raw to cooked with finesse. Once the meat is soft to the touch yet still resilient, we acknowledge the readiness for the next step.

6: A Respite

Patience is paramount. The cooked pork must rest, be cooled, and allowed to dry. Air becomes an ally here, wicking away moisture from the surface to set the stage for a flawless fry.

7: A Date with Destiny—The Frying

In a vessel, 4 cups of vegetable oil await. When the oil quivers with heat, the pork is gently placed in. Discipline dictates the temperature must be maintained. The shank bathes, evenly browning to a regal hue. This is not haste; this is artistry.

8: The Captivating Crunch

What marks the true bagnet is the venerable ‘crisp’. Each bite must sing a crackling opera. Achieving this is the climax of the journey — the pork withdraws from the oil bath, rests, and then re-enters for a final, defining crisping.

9: The Ensemble of Flavors

As the bagnet cools, we turn to the supporting cast. The raw sharpness of sliced shallots, the fieriness of red chili, and the tang of tomatoes create a sauce of 2 tbsp bagoong isda. This concoction is the harmony that bridges our bagnet to perfection.

10: The Grand Assembly

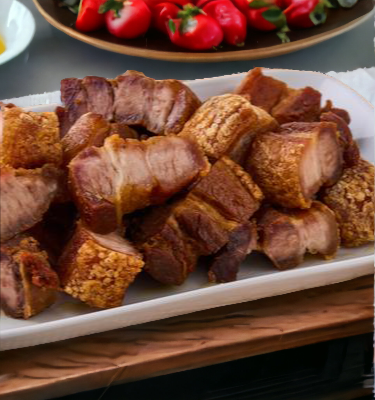
Finally, the dish comes together — the pork is carved with precision, laid out with intent, and the condiment stands by, ready to enhance. Eating bagnet is a ritual; it is the silent nod to the tradition, the respect to the ingredients, and the unabashed indulgence in richness.

The Crispy Crusade Culminates

In cooking bagnet, one does not simply follow a recipe; one embarks on a voyage. Through marinating, boiling, resting, and double-frying, we turn humble pork shanks into crisp, succulent bagnet. It is more than food; it is a cultural icon, a festival on a plate, and a tribute to patience and precision.

Discover the secrets to cooking the ultimate Filipino Bagnet. Follow our detailed guide to transform 1 kg of pork shank into a crispy, succulent delight. Experience the perfect blend of vinegar, garlic, shallots, and spices for a truly authentic feast. Join us on this crisp-filled culinary journey.

Thursday, November 23, 2023

The Savory Symphony: Garlic Beef Serenade


Introduction: Awakening Your Palette
Embark on a culinary journey where bold flavors and aromatic notes play the lead. Garlic beef—an exquisite dish that is simple yet luxurious—invites you to embrace the art of cooking with both passion and precision. This is a melody of ingredients where 0.5 kg of beef sirloin meets a symphony of spices, creating a memorable meal that resonates with every bite.

The Prelude: Preparing Your Ingredients
Before the magic begins, it is essential to have every ingredient at your fingertips. Ensure you have 0.5 kg of succulent beef sirloin, ready to absorb the flavors. Alongside, 1 head of garlic stands as the cornerstone of this dish, ready to lend its pungent, earthy notes. Gather 0.5 tsp of ground pepper, 2 tbls of butter, 1 tbl of soy cooking and seasoning sauce, 1 tsp of brown sugar, and 1 tbl of onion springs; each plays a vital role in this culinary composition.

The Ensemble: Mise en Place
Firstly, organize your workstation. This foundational step cannot be overstated; it streamlines your cooking process, ensuring a seamless blend of flavors. Slice the beef sirloin into thin, bite-sized strips, unleashing its full potential to mingle with the assorted seasonings. Mince the garlic to a fine consistency, allowing it to integrate fully into the dish, and finely chop the onion springs to sprinkle as a garnish.

The Overture: Flavor Infusion
Begin by generously seasoning the beef strips with ground pepper. This introduces a gentle warmth, laying the groundwork for the layers of taste to come. Let the meat rest momentarily, allowing the pepper to embed its zest into the very fibers of the beef.

The Crescendo: Sautéing the Garlic
In a well-heated pan, melt the butter until it sings with readiness. Introduce the minced garlic to the pan, and sauté it until golden—this is the heart of the dish, where garlic transforms, releasing its aromatic character to infuse the meal with richness.

The Forte: Browning the Beef
Usher in the beef sirloin strips, searing them until they boast a delectable brown crust. This technique ensures that the sirloin's flavors are locked in, creating a texture that is as pleasing to the bite as it is to the palate. Keep the pan lively, turning the strips to brown evenly on all sides.

The Intermezzo: Blending the Essences
As the beef reaches a perfect sear, stir in the soy cooking and seasoning sauce. The savory liquid is a choreographer, guiding the dance of ingredients in the pan, harmonizing the distinct tastes into one coherent flavor profile. Sprinkle the brown sugar and observe as its sweetness juxtaposes the umami, illustrating a culinary contrast.

The Adagio: Simmering to Perfection
Dim the flame to a gentle simmer, allowing the beef to imbibe all the aromatic tones from the garlic and seasonings. This slower pace coaxes the dish toward perfection, ensuring the beef is tender and the sauce thickens to just the right consistency.

The Accolade: Garnishing with Grace
As the dish nears completion, bestow it with onion springs, scattering them with a chef's touch. Their fresh, sharp taste cuts through the richness, elevating the dish with a final note of complexity.

The Grand Finale: Serving the Masterpiece
Transfer the garlic beef onto a serving platter worthy of its splendor. The merging flavors, now in complete unity, are ready to be savored. Accompany this main with steamed rice or a side of your choice, letting the garlic beef take center stage at your dining concerto.

Encore of Flavors
Garlic beef is not just a meal; it's an experience that lingers, prompting an encore long after the last morsel has been enjoyed. This dish marries simplicity with elegance, yielding a dining performance that deserves a standing ovation.

Dive into the richness of Garlic Beef Serenade, where beef sirloin marries aromatic garlic for a harmonious dish. Discover the step-by-step symphony, from browning beef to the garnish of onion springs, for an ultimate taste masterpiece.

Tuesday, November 21, 2023

Exploring the Art of Cooking: Mastering the Delightful Ginataang Hipon Recipe


Dive into the delightful world of Filipino cuisine with our comprehensive guide to cooking the flavorful Ginataang Hipon Recipe. Learn the art of preparing this exquisite dish with expert tips and detailed steps.

Introduction: Embracing the Aroma of Filipino Cuisine

The art of cooking encompasses a wide array of flavors and techniques, each offering a unique glimpse into the cultural tapestry of a region. Amidst the rich tapestry of Filipino cuisine, the Ginataang Hipon recipe stands as a testament to the exquisite blend of flavors and ingredients. Originating from the Philippines, this delightful dish features succulent shrimp cooked in a creamy coconut milk base, infused with aromatic spices and seasonings. As we embark on this culinary journey, we delve into the intricacies of preparing this delectable dish, unlocking the secrets to mastering its exquisite flavors and textures.

Unveiling the Ingredients: A Symphony of Flavors

Before delving into the cooking process, it's essential to acquaint ourselves with the ensemble of ingredients that form the heart of the Ginataang Hipon recipe. Begin by gathering the following components:

- 1 tbsp oil
- 1/4 cup leeks, sliced
- 1/2 kg shrimps, trimmed
- 1 (33 g) pack Ginataang Gulay
- 1 cup water
- 1 tsp garlic bits

Transitioning from selecting the freshest shrimp to infusing the aromatic leeks and garlic, each ingredient plays a pivotal role in shaping the overall flavor profile of the dish. The harmonious blend of these components creates a culinary symphony that tantalizes the palate and enlivens the senses.

Preparing the Shrimp: Culinary Choreography in Action

As we embark on the culinary choreography of the Ginataang Hipon recipe, the first step involves meticulously preparing the star of the dish - the shrimp. Begin by ensuring that the shrimp are thoroughly cleaned and trimmed, ready to take center stage in the tantalizing medley of flavors. Once prepared, the shrimp await their transformation amidst the rich coconut milk and aromatic spices.

Crafting the Aromatic Base: Infusing Flavors with Precision

The journey of crafting the Ginataang Hipon recipe ventures into the realm of aromatic alchemy, where the potent blend of leeks, garlic, and oil forms the foundation for the dish's rich flavors. With a precise application of heat and measured techniques, the amalgamation of leeks and garlic infuses the cooking space with an irresistible aroma, signifying the commencement of a culinary masterpiece in the making.

Fusion of Flavors: Embracing the Coconut Milk Symphony

The hallmark of the Ginataang Hipon recipe lies in the infusion of creamy coconut milk, elevating the dish to unprecedented heights of indulgence. As the coconut milk simmers, the alchemy of flavors unfurls, enveloping the shrimp in a velvety embrace that promises a symphony of flavors with every tantalizing bite.

Perfecting the Culinary Harmony: Bringing It All Together

The culinary symphony of the Ginataang Hipon recipe nears its crescendo as the meticulously prepared shrimp elegantly merge with the aromatic coconut milk base, culminating in a harmonious fusion of flavors and textures. The careful orchestration of each ingredient and the precision in executing each step manifests in a dish that transcends mere sustenance, promising an experience that tantalizes the senses and nurtures the soul.

Embracing the Culinary Adventure: The Joy of Savory Indulgence

As the exquisite aroma of the Ginataang Hipon recipe fills the air, the momentous culmination heralds a celebration of culinary mastery and the joy of savoring a dish that honors tradition and innovation in equal measure. With each tantalizing spoonful, relish the marriage of succulent shrimp, luscious coconut milk, and aromatic spices, savoring the culmination of a culinary adventure that resonates with every sensory indulgence.

Conclusion: A Culinary Odyssey to Remember

The art of cooking unfolds as a captivating tapestry of flavors, techniques, and tradition, each dish offering a unique glimpse into the cultural heritage of a region. With the Ginataang Hipon recipe, we embark on a culinary odyssey that celebrates the art of Filipino cuisine, unlocking the secrets to crafting a dish that transcends mere sustenance and emerges as an expression of culinary artistry. Embrace the journey, savor every moment of creation, and rejoice in the delight of savoring the exquisite Ginataang Hipon, a dish that stands as a testament to the time-honored legacy of Filipino culinary excellence.

Remember, the art of cooking is a journey of exploration, creativity, and celebration. Let each dish you craft be a reflection of your passion, a testament to the rich tapestry of flavors that captivate the senses and nourish the soul.

Key Takeaways:

- The Ginataang Hipon recipe showcases the exquisite blend of succulent shrimp, aromatic spices, and creamy coconut milk, culminating in a culinary masterpiece that celebrates Filipino cuisine.
- The careful selection of fresh ingredients and the precise orchestration of cooking techniques play a pivotal role in shaping the rich flavor profile and exquisite textures of the dish.
- Embrace the joy of savoring the Ginataang Hipon recipe, relishing each moment of creation and celebration as you embark on a culinary odyssey that transcends mere sustenance and emerges as an expression of culinary artistry.

Sunday, November 19, 2023

From Sichuan to Your Kitchen: Unlocking the Secrets of Mapo Tofu


Discover the secrets to crafting an authentic and mouthwatering Mapo Tofu dish with this step-by-step guide. From preparing the ingredients to mastering the perfect combination of flavors, learn how to cook this classic Chinese recipe to impress your family and friends.

Introduction:
Mapo Tofu, hailed as one of the most iconic and beloved dishes of Chinese cuisine, is a Sichuan-style recipe that brings the perfect blend of spice and rich flavors. Its silky tofu, paired with a savory and fiery sauce, creates a culinary masterpiece that tantalizes the taste buds. In this comprehensive guide, we will unveil the secrets to preparing authentic Mapo Tofu that will leave you craving for more.

I. Gathering the Ingredients:
Before embarking on your Mapo Tofu journey, assemble the following ingredients:
- 2 tbsp Vegetable Oil
- 6 cloves Garlic, minced
- 1 tbsp Ginger, minced
- 1 pc Onion, finely chopped
- 4 tbsp Chili Paste
- 0.25 kg Fresh Grounded Pork
- 1 sachet Oyster Sauce
- 1 cup Water
- 0.5 kg Tofu, cubed
- 1 tsp Sesame Oil
- 1 pc Scallion, chopped

II. Preparing the Aromatics and Base:
Start by heating the vegetable oil in a wok or deep pan over medium heat. Once hot, add the minced garlic, minced ginger, and finely chopped onion. Stir-fry them until they turn aromatic and light golden brown.

Next, introduce the chili paste to the wok. Stir it well into the aromatics, allowing its vibrant red hue to infuse the oil. The chili paste intensifies the heat and imparts a bold flavor to the dish.

III. Building Layers of Flavor:
Add the fresh grounded pork to the wok, breaking it up with a wooden spoon. Stir-fry the pork until it is fully cooked and slightly browned. This step adds a rich meatiness to the Mapo Tofu, enhancing its overall taste profile.

Now, introduce the sachet of oyster sauce to the wok, followed by the cup of water. Stir the mixture thoroughly, ensuring that the sauce is evenly distributed. Allow the ingredients to simmer for a few minutes to develop deep flavors.

IV. Incorporating the Tofu:
Gently add the cubed tofu to the simmering sauce. The tofu's delicate texture beautifully balances the heat and intensity of the dish. Carefully fold the tofu into the sauce, being cautious not to break it apart. Allow the tofu to absorb the flavors for about 5-7 minutes.

V. Adding the Final Touches:
To enhance the overall fragrance, drizzle the sesame oil over the Mapo Tofu. This final touch adds a subtle yet distinct nutty aroma that elevates the dish. Sprinkle the chopped scallions on top to provide a fresh and vibrant finishing touch.

VI. Serving and Enjoyment:
Your mouthwatering Mapo Tofu is now ready to be savored! Serve it hot with a steaming bowl of rice or with some noodles to complete the meal. The soft tofu, fiery sauce, and aromatic spices will delight your taste buds and transport you to the vibrant streets of Sichuan.

VII. Tips and Variations:
1. For vegetarians, skip the pork and replace it with mushrooms or textured vegetable protein (TVP) for a delicious meat-free alternative.
2. Adjust the amount of chili paste according to your preferred spice level. Add more for an extra kick or reduce for a milder version.
3. Experiment with different types of tofu, such as silken or firm, to discover your preferred texture and mouthfeel.

VIII. Storing Leftovers:
Mapo Tofu can be stored in an airtight container in the refrigerator for up to three days. Ensure it is reheated thoroughly before enjoying as leftovers to maintain its flavors.

IX. Conclusion:
Mastering the art of cooking Mapo Tofu allows you to unlock the tantalizing flavors of this beloved Chinese dish. With the perfect blend of spice, meat, and silky tofu, your taste buds will be transported to the heart of Sichuan. Follow this step-by-step guide and impress your loved ones with an authentic and unforgettable Mapo Tofu experience.


Friday, November 17, 2023

Mastering the Art of Beef Curry: A Savorous Exemplar


Discover the secrets to masterfully preparing a delectable beef curry. Learn how to combine succulent beef, fragrant spices, and fresh vegetables to create an enticing dish that will captivate your taste buds. Join us on this culinary adventure and elevate your cooking skills to new heights.

Introduction:
Beef curry is a delightful dish that combines tender meat, fragrant spices, and rich flavors. With its roots in traditional Asian cuisine, beef curry has become a global favorite. In this comprehensive guide, we will delve into the intricacies of preparing an exceptional beef curry, step-by-step. Equipped with the finest spices and fresh ingredients, you will soon create an alluring dish that will tantalize taste buds. So, let's embark on this culinary journey together!

1: Assembling the Essentials
To begin, gather the following ingredients: 1 kg Beef Short Ribs, 1 pc Bay Leaf, 1 tsp Black Peppercorn, 3 tbsp Vegetable Oil, 1 pc Potato, 1 pc Carrot, 1 head Garlic, 1 pc Onion, 1 pc Ginger, 1 Hot Chili Pepper, 1 pc Red Bell Pepper, 1 pc Green Bell Pepper, 1.5 tbsp Curry Powder, 0.25 tsp freshly ground pepper, 1 cup Fresh Coconut Cream, and 1 tbsp Cilantro.

The key to a potent curry lies in using high-quality ingredients. Select beef short ribs with ample marbling, ensuring succulence with every bite. Fresh vegetables and fragrant spices will elevate your creation to new heights.

2: Preparation is Key
Start your culinary adventure by preparing the ingredients. Finely dice the onion, garlic, ginger, carrot, and bell peppers. Slice the potato into cubes, ensuring they are of a similar size for even cooking. Remove the seeds from the chili pepper, and finely chop it.

3: Sealing in the Flavors
In a large pot, heat the vegetable oil over medium heat. Add the diced onion, garlic, and ginger, allowing them to sauté until they turn golden brown. This aromatic trio will release irresistible scents into your kitchen.

4: The Fragrant Symphony
Introduce the curry powder to the pot, stirring it into the sautéed mixture for around two minutes. This toasting process will awaken the spices, enhancing their aroma and flavor.

5: The Meaty Marvel
Now, add the beef short ribs to the pot, ensuring they are evenly coated with the fragrant spice blend. Allow the meat to sear for a few minutes on each side, forming a caramelized crust that locks in succulent juices.

6: Simmering Perfection
Pour in water until the beef is almost submerged. Ensure the bay leaf and black peppercorns find their way into the pot, enriching the flavors. Cover the pot and simmer the beef curry over low heat for approximately two hours, or until the meat is tender and falls apart effortlessly.

7: Adding a Colorful Twist
At this stage, add the diced potatoes and carrots to the pot, stirring gently. These vibrant vegetables will infuse the curry with both color and texture, providing a delightful contrast to the tender meat.

8: The Creamy Indulgence
Next, pour in the fresh coconut cream. This luscious addition creates a creamy base that complements the robust flavors of the curry. Allow the curry to continue simmering for an additional 15 minutes, allowing the flavors to meld into a harmonious union.

9: Finishing Touches
Sprinkle in the freshly ground pepper, adjusting the seasoning to suit your palate. Taste the curry and make any necessary adjustments. Remember, cooking is an art, and you are the artist, so trust your instincts.

10: A Garnish to Remember
As we approach the finale, it's time to garnish your magnificent creation. Finely chop some cilantro leaves and scatter them over the simmering curry. This herbaceous touch adds a refreshing note, enhancing both the visual appeal and the taste.


Congratulations! You have now mastered the art of cooking beef curry. With a medley of exotic spices and tender beef, this dish is sure to delight family and friends. So, roll up your sleeves, ignite your passion for cooking, and dive into the world of beef curry. Bon appétit!


Thursday, November 16, 2023

Unveiling the Flavors of Ilocos: Masterful Recipe for Ilocos-style Yusi

Unveiling the flavors of Ilocos, this blog post presents a step-by-step guide to cooking Ilocos-style Yusi. From gathering the ingredients to adding the finishing touches, immerse yourself in Ilocano culture with this succulent pork and liver stew. Prepare to savor the vibrant flavors of Ilocos through this traditional recipe.

Introduction:
Step into the culinary world of Ilocos, where rich flavors and vibrant cultures collide. One dish that stands out in this region is Ilocos-style Yusi. Prepared with care and precision, this succulent pork and liver stew captures the essence of Ilocano cuisine. In this blog post, we will take you on a culinary journey, sharing the secrets of cooking Ilocos-style Yusi and guiding you through each step of the process. Prepare your taste buds for an explosion of flavors!

1: Gather Your Ingredients
Before embarking on this gastronomic adventure, let's ensure we have all the necessary ingredients ready on our kitchen countertops. For this savory delight, you'll need 6 cloves of garlic, 6 pieces of shallots, 3 teaspoons of ginger, 500 grams of pork shoulder, 2 tablespoons of soy sauce, 0.25 teaspoon of peppercorn, 4 cups of water, 100 grams of pork liver, and 0.25 cup of onion. Remember, fresh and quality ingredients are the foundation of any great recipe!

2: Mise en Place - Preparation is Key
To create a masterpiece, a chef must be organized and prepared. Start by finely mincing the garlic, shallots, and ginger. Next, cube the pork shoulder into bite-sized pieces, ensuring each morsel is tender and juicy. Set the pork liver aside for later. Assemble the rest of the ingredients and place them within easy reach, allowing for a seamless cooking experience.

3: Sautéing Aromatics
In a large pan, heat some oil over medium heat. As the oil shimmers, add the minced garlic, shallots, and ginger. Saute them until they turn golden brown and release their fragrant aroma. The tantalizing scent in your kitchen will transport you to the vibrant streets of Ilocos, where the air is filled with the essence of traditional delights.

4: Browning the Pork
With the aromatics dancing in the pan, it's time to add the cubed pork shoulder. Sear the pork until it develops a tempting caramelized exterior. This process not only enhances the flavor but also ensures a delightful texture in every bite. The sizzling sound and the mouthwatering aroma will make your taste buds tingle in anticipation.

5: Building Layers of Flavor
Now, it's time to introduce the star ingredient – soy sauce. Pour in the soy sauce, allowing it to coat every piece of pork. The umami-rich sauce will infuse the meat with its distinct savory taste. Sprinkle in the peppercorns, lending a subtle kick to your Yusi. Give the ingredients a gentle stir, allowing them to meld together and deepen the complexity of flavors.

6: Simmering to Perfection
Pour the water into the pan, ensuring it covers the pork. Bring the liquid to a boil, then reduce the heat to a gentle simmer. Cover the pan and let the Yusi cook slowly, allowing all the flavors to meld together harmoniously. This slow-cooking process promotes tenderness, allowing the pork to soak up the mouthwatering sauce.

7: Adding the Finishing Touches
After about an hour of simmering, it's time to introduce the pork liver. Cut the liver into thin strips and add it to the bubbling pot. This addition adds an extra layer of richness and depth to your Yusi. Allow the liver to cook for an additional 5-10 minutes until tender but still slightly pink in the center. The liver should melt in your mouth, complementing the succulent pork.

8: Serving Suggestions
The moment has arrived! Ladle your Ilocos-style Yusi into bowls, ensuring everyone receives their fair share of flavorful pork and tender liver. This hearty dish pairs well with steamed rice, allowing you to savor every bite of the delectable broth. Sprinkle some freshly chopped onions on top for a burst of crispness that adds a delightful contrast to the richness of the stew.

9: Sharing the Ilocano Delight
Ilocos-style Yusi is more than just a recipe; it's a celebration of Ilocano culture and flavors. Share this delightful dish with friends and family, and let them experience the unique taste of Ilocos. From its humble origins to your kitchen, this recipe pays homage to the traditional Ilocano ethos of bringing people together through food.

10: Conclusion
Cooking Ilocos-style Yusi allows you to immerse yourself in the vibrant world of Ilocano cuisine. The combination of succulent pork, tender liver, and aromatic flavors creates a dish that is both comforting and exciting. By following our step-by-step guide, you can recreate this Ilocano masterpiece in your own kitchen. So, don your chef's hat, gather your ingredients, and embark on a culinary adventure that will transport you to the sun-kissed shores of Ilocos!


Sunday, November 12, 2023

Mastering the Art of Cooking Pancit Bihon: A Flavorsome Delight

Discover the art of cooking Pancit Bihon with our step-by-step guide. Unveil the secrets to preparing this Filipino noodle dish rich in flavors, featuring tender chicken, fresh vegetables, and perfectly balanced seasonings. Learn how to sauté the aromatics, cook the chicken, and incorporate the vegetables seamlessly. Master the technique of simmering and discover the trick to achieving perfectly cooked Bihon noodles. With a final touch of garnish and a twist of calamansi, serve this beloved Filipino dish that will entice your taste buds and leave your loved ones asking for seconds. Join us on this culinary journey today!

Introduction:
Welcome to our culinary journey where we unravel the secrets of preparing a delectable Filipino dish - Pancit Bihon. This classic Filipino noodle dish is a medley of vibrant flavors, tender chicken, fresh vegetables, and the perfect balance of seasonings. In this comprehensive guide, we will walk you through each step on how to cook Pancit Bihon to perfection, ensuring that you impress your family and friends with this mouthwatering creation in no time.

1: Gathering the Ingredients
To embark on our Pancit Bihon adventure, start by procuring the essential ingredients:

- 2 cups Water
- 1 pc Chicken Breast
- 2 tbsp Vegetable Oil
- 4 cloves Garlic
- 1 pc Onion
- 1 sachet Oyster Sauce
- 0.25 tsp Ground Pepper
- 100 g Bihon
- 1 pc Carrot
- 1 cup Cabbage
- 1 tbsp Spring Onion
- 4 pcs Calamansi

2: Prepping the Ingredients
Begin by preparing the ingredients to ensure a streamlined cooking process. Wash the vegetables thoroughly, then julienne the carrot and cabbage into thin strips. Dice the chicken breast into bite-sized pieces. Mince the garlic and finely chop the onion. Squeeze the juice from the calamansi and set aside for later use.

3: Sautéing the Aromatics
In a large skillet or wok, heat the vegetable oil over medium-high heat. Add the minced garlic and chopped onion, stirring continuously until they turn golden brown and fragrant. This step imparts a delightful aroma to the dish.

4: Cooking the Chicken
Introduce the diced chicken breast to the skillet, allowing it to cook thoroughly until no longer pink in the center. Stir occasionally to prevent sticking. The chicken provides a protein-packed foundation to the Pancit Bihon.

5: Flavorful Simmering
Pour the water into the skillet, followed by the oyster sauce and ground pepper. Allow the mixture to simmer gently, allowing the flavors to meld together beautifully. This step infuses the broth with irresistible umami and harmonizes the ingredients.

6: Preparing the Bihon Noodles
Meanwhile, soak the Bihon noodles in water for a few minutes until they become pliable. Drain the excess water, keeping the noodles moist. This process ensures the noodles cook evenly and maintain their delightful texture.

7: Adding the Noodles to the Dish
Once the broth has achieved the perfect harmony of flavors, gently add the soaked Bihon noodles to the skillet. Using tongs or chopsticks, carefully toss and combine the noodles with the chicken and aromatic base. The noodles act as the canvas for the mouthwatering flavors that await.

8: Incorporating the Vegetables
Introduce the julienned carrots and cabbage to the skillet, distributing them evenly among the noodles. Stir-fry these vibrant vegetables with the other ingredients, allowing their crispness to complement the softness of the noodles and chicken.

9: Perfecting the Pancit Bihon
Give your Pancit Bihon a final toss, ensuring all the ingredients are well-incorporated. Cook for a few more minutes until the noodles are tender but not mushy. Continuously stir to prevent sticking and to ensure the flavors are evenly distributed throughout the dish.

10: Garnish and Serve with a Twist
To add a final touch, garnish your Pancit Bihon with fresh spring onions and a generous squeeze of calamansi juice. This burst of freshness elevates the dish to new heights. Serve your Pancit Bihon hot and savor the delightful medley of flavors that embody the heart and soul of Filipino cuisine.