Sunday, July 30, 2023

A Delicious Delight: How to Cook Ginataang Malunggay in 10 Easy Steps

Looking for a delectable and healthy Filipino dish? Learn how to cook Ginataang Malunggay, a mouthwatering blend of ingredients like Ginataang Gulay Mix, fresh malunggay leaves, and tasty tuyo flakes. Follow these 10 simple steps to create a flavorful and nutritious dish that will surely satisfy your taste buds.

Introduction:
Who doesn't love a warm, comforting meal that’s both delicious and healthy? If you’re a fan of Filipino cuisine, you're in for a treat! In this blog post, we'll show you the ins and outs of preparing a traditional Filipino dish called Ginataang Malunggay. Combining the richness of coconut milk, the nutritional goodness of malunggay leaves, and the savory touch of tuyo flakes, this dish will transport you to the sunny shores of the Philippines. So, roll up your sleeves and get ready to indulge in this delightful culinary adventure!

1: Gathering the Ingredients
To begin this gastronomic journey, gather the following ingredients: 1 pack (33g) Ginataang Gulay Mix, 1 cup of water, 1 bundle of fresh malunggay leaves, and 1 piece of tuyo, flaked. These ingredients form the backbone of this delightful dish, ensuring a burst of flavors that will tantalize your taste buds.

2: Prepping the Malunggay Leaves
First things first, it's time to prepare the malunggay leaves. Take the bundle of fresh malunggay leaves and remove them from the stems. Rinse them thoroughly under cold running water to get rid of any dirt or impurities. Once you've cleaned the leaves, set them aside to dry or pat them gently with a towel to remove excess moisture.

3: Preparing the Tuyo Flakes
Next, it's time to prepare the star ingredient that adds a unique savory flavor to Ginataang Malunggay – the tuyo flakes. Begin by carefully removing the fish bones from the tuyo fillet. Using your hands, gently flake the tuyo into small pieces, ensuring they are evenly sized for consistent distribution throughout the dish. Set aside these flavorful tuyo flakes and prepare to combine them with the other mouthwatering ingredients.

4: Sautéing the Ginataang Gulay Mix
Heat a pan over medium heat and add a small amount of cooking oil. Once the oil is hot, pour the 1 pack (33g) of Ginataang Gulay Mix into the pan. Sauté the mix for a few minutes until it becomes fragrant and releases its rich aroma. This step is crucial for enhancing the flavors of the dish, so make sure to give it your full attention.

5: Adding the Water
Once the Ginataang Gulay Mix is nicely sautéed, it's time to add the liquid component. Pour 1 cup of water into the pan, using a spatula or spoon to scrape off any remaining bits of mix from the pan's edges. Stir the mixture well to ensure the Gulay Mix is fully dissolved and evenly distributed throughout the liquid. Allow the mixture to simmer for a few minutes, allowing the flavors to meld together.

6: Incorporating the Malunggay Leaves
Now it’s time to add the fresh malunggay leaves, which are not only tasty but also packed with nutrients. Gently sprinkle the prepared malunggay leaves into the pan, distributing them evenly. Give the mixture a good stir to ensure that the leaves are submerged in the flavorful sauce. Allow the leaves to cook for a few minutes until they become tender but still retain their bright green color.

7: Introducing the Tuyo Flakes
As the malunggay leaves cook and release their vibrant flavors into the sauce, carefully incorporate the tuyo flakes into the mixture. Stir gently to scatter the flakes evenly, ensuring they are distributed throughout each bite. The tuyo flakes will add a delightful briny depth to the dish, complementing the creamy coconut sauce and the earthy malunggay leaves.

8: Simmering to Perfection
Adjust the heat to low and let the Ginataang Malunggay simmer gently. This simmering process allows the dish to fully develop its flavors and ensures that the malunggay leaves absorb all the savory goodness. Keep an eye on the dish, stirring occasionally to prevent it from sticking to the bottom of the pan.

9: The Finishing Touch
Once the Ginataang Malunggay has simmered for about 10-15 minutes, taste the dish. Adjust the seasoning with salt and pepper according to your preference. Remember, balance is key! If desired, you can also add a squeeze of calamansi or a splash of patis (fish sauce) for an extra zing of flavor. Allow the dish to simmer for a few more minutes. When ready, turn off the heat and prepare to delight in the mouthwatering outcome of your efforts.

10: Serving Suggestions
Ginataang Malunggay is best enjoyed piping hot, served with steamed rice. The combination of fluffy rice and creamy, flavorful sauce creates a truly heavenly experience. Feel free to garnish the dish with additional flakes of tuyo, a sprinkle of chili flakes, or a handful of crispy fried garlic for added texture and visual appeal. Gather your loved ones around the dining table and savor this authentic Filipino dish together.

In conclusion, cooking Ginataang Malunggay is a delightful experience that brings together the richness of coconut milk, the nutritional power of malunggay leaves, and the savory touch of tuyo flakes. With these simple steps, you can recreate this traditional Filipino dish and enjoy its authentic flavors in the comfort of your own home. So, why not embark on this culinary adventure and treat yourself and your loved ones to the wonders of Ginataang Malunggay tonight?


Friday, July 28, 2023

Health and Comfort Combined: Nutritious Tips for Perfecting Ginisang Monggo


Learn how to prepare the classic Filipino dish, Ginisang Monggo, packed with whole monggo beans, savory pork, and nutritious malunggay leaves. This step-by-step guide will help you create a comforting and flavorful dish that's perfect for any occasion.

Introduction:

Ginisang Monggo, also known as Mung Bean Soup, is one of the most beloved and iconic Filipino dishes. With its heartwarming flavors, it has become a staple in many Filipino households. This nutritious and delicious dish is not only easy to prepare but also loaded with essential ingredients such as whole monggo beans, savory pork, and an array of vegetables. Whether you're a fan of Filipino cuisine or simply curious about exploring international flavors, this recipe is the perfect introduction to the charm of Filipino comfort food.

1: Gather Your Ingredients
To start your culinary adventure, first, make sure you have all the necessary ingredients. It's best to gather them before you begin cooking to ensure a smooth preparation process. For this recipe, you will need the following:

- 1 cup whole monggo beans
- 4 cups water
- 2 tbsp. vegetable cooking oil
- 5 cloves garlic, mashed
- 1 pc. medium-sized onion, chopped
- 3 pcs. medium-sized red tomatoes, chopped
- 1/4 kilogram pork strips
- 1/4 cup ampalaya, sliced very thinly (optional)
- 1 cup malunggay leaves
- Topping: 1/2 cup crushed pork chicharon (optional)

2: Preparing the Beans
Start by rinsing the whole monggo beans thoroughly under running water. This step will remove any dirt or impurities. Afterward, place the beans in a large bowl and cover them with water. Let them soak for at least an hour. This process will help soften the beans and reduce cooking time.

3: Cooking the Pork
In a large pot, heat the vegetable cooking oil over medium heat. Add the mashed garlic and chopped onion and cook until fragrant and golden brown. Then, add the chopped red tomatoes and sauté until they become soft and mushy.

Once the tomatoes are cooked down, it's time to add the pork strips. Stir and cook until the pork changes color and becomes slightly browned. The pork's natural juices will add depth and flavor to the dish.

4: Simmering the Monggo Beans
Drain the soaked monggo beans and add them to the pot with the cooked pork. Stir everything together until well combined. Then, pour in the 4 cups of water, ensuring that the beans and pork are fully submerged.

Increase the heat to high and bring the mixture to a boil. Once it starts boiling, reduce the heat to low, cover the pot, and let it simmer for approximately 25-30 minutes or until the monggo beans are tender. Stir occasionally to prevent the beans from sticking to the bottom of the pot.

5: Adding Ampalaya (Optional)
Ampalaya, also known as bitter gourd or bitter melon, is an optional ingredient that adds a delightful bitterness to the dish. If you enjoy its unique flavor, now is the perfect time to incorporate it into your Ginisang Monggo.

Slice the ampalaya very thinly and add it to the pot. Allow it to cook for another 5 minutes or until it becomes tender. By this point, your kitchen will be filled with the enticing aromas of the simmering dish.

6: Introducing Nutritious Malunggay Leaves
Malunggay leaves, also known as moringa leaves, are a superfood powerhouse renowned for their health benefits. They add a vibrant green color and a rich earthy flavor to the dish. Now is the time to add this nutritious ingredient.

Stir in the malunggay leaves and let them cook for approximately 2-3 minutes. It's important not to overcook the leaves, as they can lose their vibrant color and turn dull.

7: Optional Toppings for Extra Crunch
For those who crave an additional layer of texture and flavor, crushed pork chicharon can be used as a topping. This optional ingredient adds a delightful crunch and a burst of savory goodness to your Ginisang Monggo.

Crush the pork chicharon into small pieces and sprinkle it generously over your bowl of Ginisang Monggo before serving. Each spoonful will offer a delightful contrast of textures.

8: Serving Suggestions
Ginisang Monggo is best enjoyed hot and steamy, especially on a chilly evening. Serve it alongside freshly steamed rice, and you have a complete meal that will satisfy your taste buds and warm your heart.

To add an interesting twist, you can also pair Ginisang Monggo with fried fish, marinated meat, or a crisp salad. These accompaniments provide a perfect balance to the flavors in the dish.

9: Storing and Reheating
If you have any leftovers, don't worry! Ginisang Monggo can be stored in an airtight container in the refrigerator for up to 3 days. Simply reheat it in a pot over low heat until it reaches the desired temperature. However, note that reheating can cause the beans to become softer, so adjust the cooking time accordingly.

10: Final Thoughts
Ginisang Monggo is a dish that truly encapsulates the heart and soul of Filipino cuisine. With its simple yet comforting flavors, it has become a household favorite across generations. Whether it's a family gathering, a cozy night in, or a special celebration, Ginisang Monggo is always a delightful addition to any menu.

So why not grab a pot, gather the ingredients, and embark on this delicious culinary journey? Invite your loved ones to share the experience and create lasting memories together. With each spoonful, you'll discover the richness and warmth that makes Filipino cuisine so special.


Thursday, July 27, 2023

Unleash Your Culinary Skills: Sweet Chili Crab Recipe to Savor Every Bite!

Get ready to embark on a culinary adventure with our Sweet Chili Crab recipe. Delight in the perfect balance of sweet and spicy flavors as you savor succulent crab meat drenched in a rich chili sauce. This step-by-step guide will empower you to experience gastronomic bliss, transforming your kitchen into a seafood haven. Don't forget to grab some napkins and your appetite as we unveil the secrets to cooking this sensational dish!

Introduction:
Welcome, foodies, to another tantalizing recipe on our blog! Today, we're diving into the vibrant world of seafood delicacies with a dish that truly represents the fusion of sweet and chili flavors. Get ready to embark on a journey of taste sensations as we guide you through the step-by-step process of cooking the irresistible Sweet Chili Crab. So, grab your apron and let's get cooking!

1: Gather the Essentials
To begin this epic culinary adventure, you'll need to gather the following ingredients: 1 kg. live female mud crab, 2 tbsp. butter, 4 cloves garlic, 0.5 pc. ginger, 2 tbsp. chili paste, 0.25 cup catsup, 2 tbsp. brown sugar, 0.5 cup water, 0.25 tsp. freshly ground pepper, 1 pc. egg, and 1 stalk scallion.

2: Prep the Star of the Show - The Crab
First things first — handle your live female mud crab with care. Ensure it is cleaned and all the gills are removed. Break the crab into pieces for easy eating and set them aside.

3: Let the Cooking Begin
Melt the butter in a wok or large pan over medium heat. Add the minced garlic, grated ginger, and chili paste. Stir-fry for a minute until the fragrance fills the air and your mouth starts to water. 

4: The Flavor Powerhouses
Now, it's time to unleash the magic of flavors! Add the catsup, brown sugar, water, and freshly ground pepper. Give it a good stir and let it simmer for a few minutes as the tantalizing aroma envelops your kitchen.

5: Dive Into the Chili Sauce
Place the crab pieces into the wok and ensure they are well-coated with the chili sauce. Let the delicate crab meat soak up all the flavors as it simmers in the sauce. Feel free to adjust the heat by adding more chili paste if you prefer a spicier kick!

6: Time to Bind
In a small bowl, beat the egg. Gradually pour it into the wok, stirring continuously. This step will help bind the sauce while adding a rich and velvety texture to your Sweet Chili Crab.

7: The Final Touch
As your Sweet Chili Crab dish nears perfection, sprinkle some chopped scallions on top. The vibrant green color will enhance the overall presentation and provide a refreshing taste, balancing the richness of the chili crab.

8: Bring on the Feasting!
Your Sweet Chili Crab is now ready to be devoured, but remember to exercise patience as good things come to those who wait! Allow the crab to simmer in the sauce for a few more minutes, allowing the flavors to blend harmoniously.

9: Serving Suggestions
Sweet Chili Crab is best enjoyed with a delicious side of steamed rice. The fluffy, fragrant rice will perfectly complement the succulent crab meat and bring balance to the dish. Remember to have some napkins handy, as eating with your hands is highly encouraged for the ultimate sensory experience!

10: There's Always Room for Seconds
Don't forget to savor every morsel and relish in the joy of cooking this sensational Sweet Chili Crab recipe. Get creative and add your personal touch by experimenting with additional ingredients like finely chopped cilantro or a squeeze of lime for a zesty twist!

Conclusion:
Congratulations, culinary master! You have successfully mastered the art of cooking Sweet Chili Crab. The enticing aroma, the mouthwatering flavors, and the satisfying combination of sweetness and spiciness are sure to linger in your memory. Let this dish become a showstopper at your next dinner party or a delightful treat for yourself during a cozy night in. So, put on that apron and let your kitchen transform into a culinary haven. Now, go ahead and surprise your taste buds!


Thursday, July 20, 2023

Delicious and Flavorful Chicken Embutido: A Step-by-Step Guide

Introduction:
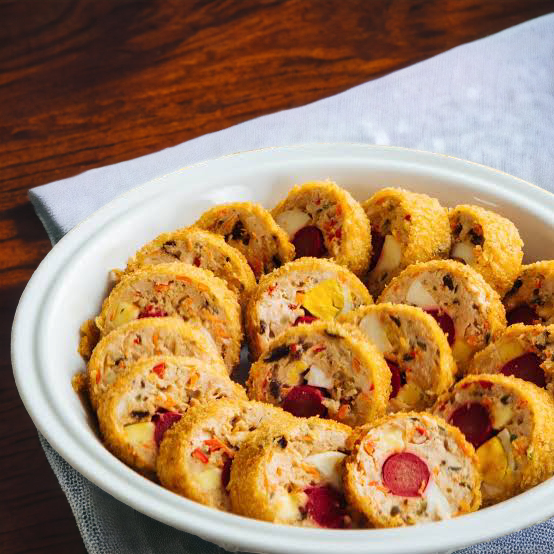
If you're a fan of Filipino cuisine then we've got a mouthwatering treat for you. Our recipe for Chicken Embutido will take your taste buds on a delightful journey. This dish blends the flavors of ground chicken carrots pickle relish and bell peppers all wrapped in a savory package. It's truly a Filipino classic that never disappoints. So let's dive into the kitchen and learn how to cook this delectable Chicken Embutido!

Dive into the kitchen and learn how to cook the delicious Filipino dish Chicken Embutido. This blog post provides step-by-step instructions on gathering the ingredients assembling the dish and cooking it to perfection. Impress your loved ones with this flavorful and versatile party favorite.

1: Gather Your Ingredients
Before you start cooking make sure you have all the necessary ingredients on hand. For this recipe you'll need:

- 0.5 kg. Ground Chicken
- 0.25 cup Bread Crumbs
- 0.25 cup Evaporated Milk
- 2 tbsp. Pickle Relish
- 1 pc. Carrot finely diced
- 1 pc. Hard Boiled Egg sliced
- 1 pc. Red Bell Pepper finely diced
- 0.5 bar Cheddar Cheese grated
- 2 tbsp. Water
- 2 tbsp. Vegetable Oil
- 1 pc Egg medium-boiled halved
- 2 tbsp. Vegetable Oil for frying

2: Preparing the Chicken Mixture
To start let's prepare the chicken mixture. In a large mixing bowl combine the ground chicken bread crumbs evaporated milk pickle relish diced carrot diced bell pepper grated cheddar cheese and water. Mix everything together until well combined. Make sure all the ingredients are evenly distributed for a harmonious flavor.

3: Assembling the Chicken Embutido
Now it's time to assemble the Chicken Embutido. Lay a sheet of aluminum foil on a flat surface around 12 inches long. Scoop about a cup of the chicken mixture onto the aluminum foil and shape it into a rectangular log leaving a space in the center. Place the hard-boiled egg halves lengthwise down the middle of the log. Roll the meat mixture tightly around the eggs ensuring they're completely enclosed. Repeat this process with the remaining mixture.

4: Cooking the Chicken Embutido
Once your embutidos are assembled it's time to cook them. Heat the vegetable oil in a frying pan over medium heat. Carefully transfer the embutidos into the pan seam side down. Fry them until they turn golden brown on all sides ensuring they are cooked thoroughly. This process should take about 10-15 minutes per side. You can fry them in batches if needed ensuring each embutido has enough space to cook evenly.

5: Serving the Chicken Embutido
After your Chicken Embutidos are cooked to perfection let them cool for a few minutes before slicing them into thick even portions. Serve them hot and savor the delightful combination of flavors. You can enjoy the Chicken Embutido as a main dish alongside steamed rice or as a delicious appetizer at parties and gatherings.

6: Storage and Reheating
If you have some leftover Chicken Embutido don't worry! You can store them in an airtight container in the refrigerator for up to three days. To reheat simply place them on a microwave-safe plate and microwave for a minute or two until heated through. You can also reheat them in a preheated oven at 350°F for about 10 minutes. Just make sure to check the internal temperature to ensure they're hot enough.

7: Variations and Tips
1. For a twist you can add cooked bacon chopped jicama or green peas to the chicken mixture. Experiment with different ingredients to create your personalized version of Chicken Embutido.
2. To maintain the juiciness of the Embutido avoid overcooking it. Cooking time may vary slightly based on the thickness of your embutidos so keep an eye on them while frying.
3. If you prefer a crispier texture you can roll the cooked Chicken Embutido in breadcrumbs before frying them. This will add an additional crunch to each bite.

8: Chicken Embutido: A Party Favorite
Chicken Embutido is a versatile dish perfect for parties and special occasions. It can be served hot or cold making it a convenient option for potlucks and gatherings. Its beautiful presentation and explosive flavors will impress your guests and leave them asking for more. So the next time you're hosting a celebration consider adding Chicken Embutido to your menu for a memorable feast.

9: The Delightful Filipino Classic
Originating from Spain Embutido made its way to the Philippines and became a staple in Filipino cuisine. This delicious meatloaf dish is often enjoyed during holidays fiestas and family gatherings. Passed down through generations it has become a beloved family recipe that brings people together.

In Conclusion
Cooking Chicken Embutido might seem intimidating at first but with the right ingredients and a little patience you can create a mouthwatering masterpiece. The flavorful blend of ground chicken vegetables and spices combined with the surprise of a hard-boiled egg in the center is sure to amaze your taste buds. So gather your ingredients follow the simple steps and indulge in this Filipino classic. Your family and friends will be blown away by your culinary skills!


Tuesday, July 18, 2023

Veggie Spring Rolls: A Crunchy and Delicious Twist on Asian Cuisine

Learn how to cook veggie spring rolls in this step-by-step guide. Packed with julienned carrots, potatoes, and togue, these crispy delights are a must-try for all plant-based food lovers. Explore our easy-to-follow recipe and enjoy a burst of flavors in every bite!


1: Introduction
Welcome to our kitchen! Today, we're going to dive into the flavorful world of veggie spring rolls. Whether you're a vegetarian or simply looking to add more plant-based dishes into your repertoire, these crispy delights are sure to satisfy your taste buds. With a combination of fresh vegetables and a tantalizing blend of seasonings, veggie spring rolls offer a culinary adventure in every bite. So, grab your apron and let's get started!

2: Ingredients and Preparation
Before we begin rolling, let's gather all the ingredients we'll need for this recipe:

- 1 tsp. (5ml) Cooking oil
- 1 1/2 cups (125g) Carrot, julienned
- 1 1/4 cups (125g) Potato, julienned
- 4 cups (250g) Togue, washed
- 1/4 tsp. (2.5g) Salt, iodized
- 16 pcs. (91.2g) Lumpia wrapper, small
- 1 piece (50g) Egg, beaten
- 1 pack (62g) Original Breading Mix
- 2 cups (500ml) Cooking oil

Start by washing and julienned the carrots and potatoes. Be sure to cut them into thin, matchstick-like strips for that perfect crunch. Once the vegetables are prepared, set them aside and move on to the next step.

3: Stir-Frying the Vegetables
In a large skillet or wok, heat 1 teaspoon of cooking oil over medium heat. Once the oil is hot, add the julienned carrots and potatoes. Stir-fry them for about 2-3 minutes until they start to soften slightly. The goal here is to partially cook the vegetables, ensuring they maintain a bit of firmness and retain their vibrant colors.

After stir-frying the carrots and potatoes, add the washed togue to the skillet. Season with 1/4 teaspoon of iodized salt, or adjust to taste. Stir-fry the mixture for an additional 2 minutes, allowing the flavors to meld together. Remember, we want the vegetables to be cooked but still crisp, giving our spring rolls a delightful bite.

4: Wrapping the Spring Rolls
Now comes the fun part – it's time to wrap the spring rolls! Lay out a lumpia wrapper on a clean surface, forming a diamond shape. Place around 2 tablespoons of the vegetable filling onto the lower third of the wrapper. Fold the sides inward, then tuck the bottom corner over the filling. Roll the wrapper tightly, making sure there are no gaps or loose ends. To secure the roll, brush a bit of beaten egg on the top corner of the wrapper and press it down. Repeat this process until all the filling and wrappers are used.

5: Crispy Coating
For an extra crispy texture, we'll be giving our spring rolls a flavorful coating. In a shallow dish, pour the Original Breading Mix. Take each wrapped spring roll and lightly roll it in the breading mix, ensuring all sides are evenly coated. This step will add a delicious crunch to the exterior while keeping the veggies tender and flavorful inside.

6: Frying the Spring Rolls
In a deep frying pan or pot, heat approximately 2 cups of cooking oil over medium-high heat. To check if the oil is hot enough, add a small piece of spring roll wrapper. If it sizzles and turns golden within a few seconds, it's time to fry!

Gently place the coated spring rolls into the hot oil, ensuring they are not overcrowded. Fry them for around 3-4 minutes, or until they turn golden brown. Use a slotted spoon or tongs to remove the spring rolls from the oil, allowing any excess oil to drain. Repeat this process until all the spring rolls are fried to perfection.

7: Ready to Serve
Once you've finished frying all the spring rolls, it's time to enjoy the delicious fruits of your labor! Serve them hot and crispy with your favorite dipping sauce, such as sweet chili sauce or soy sauce mixed with a touch of lime juice. The combination of the crispy exterior and the flavorful vegetable filling will surely impress your taste buds and those lucky enough to share this delightful dish with you!

8: Storing and Reheating
If you have any leftover spring rolls, you can store them in an airtight container in the refrigerator for up to 3 days. To reheat, preheat your oven to 350°F (175°C). Arrange the spring rolls on a baking sheet and bake for about 10 minutes, or until they're heated through and crispy once again.

9: Variations and Additions
While the classic veggie spring rolls are already bursting with flavor, feel free to experiment with different vegetables and fillings. You can add sliced bell peppers, mushrooms, or even tofu for an extra protein boost. Explore your culinary creativity and discover the combinations you love the most. Don't forget to share your innovative creations with us and inspire fellow food enthusiasts!

10: Final Thoughts
Learning how to cook veggie spring rolls opens up a whole world of delicious, plant-based possibilities. From family gatherings to dinner parties, these crispy delights are sure to impress guests of all dietary preferences. Plus, their delightful flavors and satisfying crunch make them a hit among both kids and adults alike.

So, step into your kitchen, gather those fresh vegetables, and embark on a culinary adventure. Let the aroma of stir-fried goodies fill your home as you wrap and fry until perfection is achieved. Your taste buds will thank you, and your friends and family will be asking for more!


Sunday, July 16, 2023

Sweet and Sour Pork Balls: A Tangy Delight That Packs a Punch!


Learn how to cook the perfect Sweet and Sour Pork Balls that will tantalize your taste buds with their tangy flavor. With simple ingredients like ground pork, breadcrumbs, and a delectable combination of sweet and sour sauce, this dish is guaranteed to become a family favorite. Get ready to enjoy a mouthwatering culinary journey!

Introduction:

Welcome to my kitchen, where today we're diving into the world of sweet and sour goodness with a delightful twist - Sweet and Sour Pork Balls! If you're looking for a quick and easy recipe that will satisfy your cravings for a flavorful meal, you're in the right place. Bursting with juicy ground pork, crispy breadcrumbs, and a lip-smacking sweet and sour sauce, these pork balls are perfect for both casual gatherings and cozy nights in. So let's roll up our sleeves, put on our aprons, and get ready to embark on a culinary adventure!

1: Gather Your Ingredients and Tools

Before we jump into the cooking process, let's gather all the necessary ingredients and tools to ensure a smooth and enjoyable cooking experience. For the delicious Sweet and Sour Pork Balls, you will need the following:

Pork balls:
- 1/4 kilo (250g) Ground pork
- 2 pcs. (60g) Eggs, beaten
- 1/2 cup (30g) Breadcrumbs
- 1/4 tsp. (1g) Ground black pepper
- 1/2 pack (4g) Flavor Seasoning Mix
- 2 Tbsps. (20g) Flour
- 1/2 cup (125ml) Cooking oil

Sweet and Sour Sauce:
- 2 Tbsps. (30ml) Cooking oil
- 1 pc. (55g) Onion, thinly sliced
- 1 cup (150g) Carrot, thinly sliced
- 1/2 cup (50g) Bell pepper, green, thinly sliced
- 1 pack (200g) Sweet and Sour Sauce
- 1 tsp. (5g) Sesame seeds, white

In addition to these ingredients, gather a mixing bowl, a frying pan, a slotted spoon or tongs for frying, a spatula for stirring, and a plate lined with paper towels for draining the oil.

2: Preparing the Pork Balls Mixture

Now that we have everything we need, it's time to start preparing the star of the show - the pork balls! In a mixing bowl, combine the ground pork, beaten eggs, breadcrumbs, ground black pepper, and flavor seasoning mix. Use your hands to mix everything thoroughly, ensuring that all the ingredients are well incorporated.

Once the mixture has come together, it's time to shape them into bite-sized pork balls. Take a small portion of the mixture and roll it between your palms to form a round ball. Repeat this process until you have used up all the pork mixture. The size of each pork ball may vary depending on your preference, but aim for golf ball-sized portions for a perfectly balanced texture. Set the pork balls aside on a plate.

3: Frying the Pork Balls

With the pork balls ready, it's time to fry them to golden perfection. Heat the cooking oil in a frying pan over medium heat until it reaches around 350°F (175°C). You can test the oil readiness by dropping a small piece of bread or pork mixture into the oil - if it sizzles and turns golden brown in a few seconds, you're good to go.

Carefully place the pork balls into the hot oil, ensuring they have enough space to fry without sticking together. Depending on the size of your pan, you may need to fry them in batches. Fry the pork balls for approximately 4-5 minutes or until they turn golden brown, then use a slotted spoon or tongs to remove them from the oil. Drain any excess oil by placing the fried pork balls on a plate lined with paper towels.

4: Creating the Tangy Sweet and Sour Sauce

Now that the pork balls are perfectly fried and waiting to be coated in a tantalizing sauce, let's prepare the irresistible sweet and sour sauce. In the same frying pan, heat the remaining cooking oil over medium heat. Add the thinly sliced onions, carrots, and green bell peppers, and sauté them until they become tender and slightly caramelized. The aromas of this colorful medley dancing around your kitchen will surely get your taste buds tingling with anticipation.

Once the vegetables are cooked, it's time to add the star of the show - the Sweet and Sour Sauce! Pour the entire pack (200g) of Sweet and Sour Sauce into the pan, stirring it well with the sautéed vegetables. Allow the sauce to simmer for a couple of minutes, allowing all the flavors to meld together beautifully. You can sprinkle a teaspoon of white sesame seeds on top for an added touch of texture and nutty flavor.

5: Coating the Pork Balls with Sweet and Sour Sauce

With the sweet and sour sauce merrily bubbling away, it's time to bring the pork balls into the party! Gently place the fried pork balls into the pan with the sauce, ensuring they are submerged in the tangy goodness. Use a spatula to coat the pork balls evenly, making sure each pork ball is generously coated in that irresistible sweet and sour sauce.

Allow the pork balls to simmer in the sauce for another 5-7 minutes, ensuring they are thoroughly heated and the flavors marry together. Keep a close eye on them to prevent overcooking, as we want the pork balls to remain moist, juicy, and bursting with flavors. Once the pork balls are coated and heated through, turn off the heat, and let them rest for a few minutes.

6: Serving and Enjoying the Sweet and Sour Pork Balls

The moment we've all been waiting for has arrived! It's time to plate up our delectable Sweet and Sour Pork Balls and dive into a burst of flavors. Serve the pork balls with steamed rice or noodles, allowing the sauce to mingle and marry with the starch, creating a divine fusion of tastes. Garnish your plate with fresh herbs like cilantro or green onions for a pop of color and freshness.

Each bite of these tender, succulent pork balls will take your taste buds on a journey through a symphony of sweet, tangy, and savory sensations. The crispy exterior gives way to a juicy, perfectly seasoned interior, while the sauce adds a mouthwatering burst of flavor that will leave you craving for seconds. Don't forget to pair this delightful dish with a refreshing beverage or perhaps a side of stir-fried vegetables to complete the meal.

7: Tips and Variations

- For an extra kick of spice, add some crushed red chili flakes, minced garlic, or even a few drops of Sriracha sauce to the sweet and sour sauce.
- Experiment with different vegetables like pineapple chunks, snow peas, or baby corn for a personalized touch to the dish.
- To make the pork balls gluten-free, substitute breadcrumbs with gluten-free alternatives like crushed rice crackers or cornflakes.
- Want to save time? You can make the pork balls in advance and freeze them, then simply thaw and fry them when ready to use.
- If you prefer a healthier alternative, you can bake the pork balls instead of frying them. Preheat your oven to 400°F (200°C) and bake for approximately 15-20 minutes, or until the pork balls are cooked through and lightly browned.

8: Memories Made in the Kitchen

Cooking isn't just about preparing food; it's about creating memories and connections. Sweet and Sour Pork Balls have a way of bringing people together, whether it's for a cozy family dinner or a lively gathering with friends. As you savor the delightful flavors of this dish, cherish the moments spent in your kitchen, sharing laughter and bonding over the joy of good food.


Congratulations, my fellow culinary enthusiasts! You have mastered the art of cooking Sweet and Sour Pork Balls. With simple ingredients, a touch of creativity, and a whole lot of love, you have delved into the realm of flavors and created a dish that perfectly balances sweetness and tanginess. So go ahead and share this recipe with your loved ones, treating them to a delightful culinary experience they won't forget. Enjoy!


Saturday, July 15, 2023

The Ultimate Guide to Cooking Pinoy Bistek: A Flavorful Delight!


This blog post delves into the step-by-step process of cooking Pinoy Bistek, from marinating the pork to adding the perfect balance of seasonings and spices. Discover the delicious combination of tangy soy sauce, calamansi juice, and tender meat that makes Pinoy Bistek a beloved Filipino dish. Learn essential tips and tricks to elevate your culinary skills and make every bite a savory delight!

Learn how to prepare the beloved Filipino dish, Pinoy Bistek, packed with tender pork, tangy flavors, and an irresistible aroma. This blog post will guide you through each step, from marinating the meat to achieving the perfect balance of seasonings and spices. Let your taste buds explore the wonders of this signature Filipino dish!

Introduction:
If you're on the hunt for a delicious Filipino dish that oozes with flavors and simplicity, look no further than Pinoy Bistek! This classic Filipino recipe brings together succulent pork, tangy soy sauce, and the zingy kick of calamansi juice for a delightful culinary experience. In this blog post, we will unravel the secret to cooking mouthwatering Pinoy Bistek that will leave you craving for more. Get ready to embark on a delightful gastronomic journey that takes you straight to the vibrant streets of the Philippines!

1: Gathering the Ingredients
To get started on creating your own version of Pinoy Bistek, gather the following ingredients: 1/4 kilo (250g) pork, thinly sliced, 3 tablespoons (45ml) soy sauce, 1 tablespoon (15ml) calamansi juice, 1/2 teaspoon (0.5g) pepper seasoning mix, 1 tablespoon (15g) minced garlic, 5 tablespoons (75ml) cooking oil, 1/2 cup (75g) minced white onion, 1 cup (250ml) water, 1/4 teaspoon (1.2g) iodized salt, 2 cups (200g) sliced eggplant, 1 cup (200g) canned quartered mushrooms, and 1 teaspoon (3g) minced green onion.

2: Marinating the Pork
Before we dive into the cooking process, marinating the pork is essential to infuse it with flavors. In a bowl, combine the pork slices, soy sauce, calamansi juice, pepper seasoning mix, and minced garlic. Mix everything thoroughly and ensure that each slice is coated with the marinade. Leave it to marinate for at least 30 minutes to an hour, allowing the flavors to penetrate the meat.

3: Preparing the Cooking Base
Heat the cooking oil in a pan over medium heat. Once the oil is hot, add the minced white onions and sauté until they turn translucent and fragrant. This step gives the dish its aromatic base. The sizzling onions will entice anyone within the vicinity!

4: Cooking the Marinated Pork
Once the onions are nicely sautéed, it's time to add the marinated pork to the pan. Ensure that the slices are evenly spread out, making sure they don't overlap too much. Allow the pork to sear for a few minutes on each side, until they turn brown and develop a delicious caramelized crust.

5: Adding the Flavorsome Broth
After the pork is beautifully seared, add the remaining marinade from the bowl into the pan. This will infuse the dish with an extra kick of flavor. Pour in the water and sprinkle the iodized salt. Stir everything gently, ensuring each piece of pork is coated with the flavorful broth. Cover the pan and let it simmer for around 10 minutes, allowing the flavors to meld together.

6: Enhancing the Dish with Eggplant
Bring a delightful twist to your Pinoy Bistek by adding sliced eggplants to the dish. The eggplants absorb the flavors of the meat and seasonings, taking on a unique taste. Add the sliced eggplants to the pan, nestling them around the pork. Allow them to cook for about 5 minutes or until they turn tender. The eggplants add a delightful texture and a lovely earthy note to the overall dish.

7: Adding a Touch of Umami with Mushrooms
To take your Pinoy Bistek to the next level, include canned quartered mushrooms. These tender mushrooms soak up all the flavors in the pan, contributing a rich, umami taste to the dish. Add the mushrooms, distributing them evenly among the pork and eggplants. Cook for an additional 3-4 minutes or until the mushrooms are heated through.

8: Garnishing and Serving
As a finishing touch, sprinkle some minced green onion over the Pinoy Bistek for a burst of freshness and color. This garnish adds a lovely aroma and complements the savory flavors of the dish. Serve your Pinoy Bistek with steamed rice and enjoy the harmonious symphony of flavors that will dance on your palate!

9: Tips for a Perfect Pinoy Bistek
- For an extra tender pork, you can opt to marinate it overnight or for several hours to allow the flavors to fully develop.
- To balance the tanginess and enhance the overall taste, adjust the amount of soy sauce and calamansi juice according to your preference.
- Experiment with different vegetables like bell peppers or broccoli to add more variety to your Pinoy Bistek.

10: Conclusion
Congratulations, you have successfully embarked on a culinary adventure and mastered the art of cooking Pinoy Bistek! This delightful Filipino dish is not only simple to make, but it also bursts with flavors that will transport you to the vibrant streets of the Philippines. Whether you're entertaining guests or treating yourself to a hearty meal, Pinoy Bistek will always hit the spot. So, gather your ingredients, don your apron, and let the sizzling aroma of Pinoy Bistek fill your kitchen!