Sunday, September 24, 2023

The Ultimate Pinakbet with Lechon Kawali Recipe: A Burst of Flavor in Every Bite!

Take your taste buds on a journey with our ultimate Pinakbet with Lechon Kawali recipe. This culinary masterpiece combines tender pork belly and a colorful assortment of vegetables in one delectable dish. Discover how to bring out the best flavors as we guide you through each step. Bursting with umami goodness, Pinakbet with Lechon Kawali is a feast that will leave you craving for more!

Welcome to our kitchen, where we're cooking up something truly mouthwatering today! In this blog post, we'll guide you through the process of creating a culinary masterpiece—Pinakbet with Lechon Kawali. Get ready to indulge in a symphony of flavors as we combine tender pork belly and a colorful assortment of vegetables in one delectable dish. Whether you're a Filipino food enthusiast or simply looking to try something new, this article has got you covered. So, let's roll up our sleeves and dive right into this flavorsome adventure!

1: Preparing the Ingredients
Let's start by gathering all the essentials. For this scrumptious Pinakbet with Lechon Kawali recipe, you'll need 0.5 kg of pork belly, 0.5 cup of vegetable oil, 4 cloves of garlic, 1 onion, 3 tomatoes, 2 tablespoons of bagoong alamang, 2 cups of water, 2 cups of kalabasa (squash), 1 cup of okra, 1 cup of eggplant, and 1 cup of sitaw (string beans). With these ingredients at hand, we can proceed to the next step.

Once you have everything ready, it's time to prepare the ingredients. Start by washing the vegetables thoroughly and cutting them into bite-sized pieces. Chop the garlic, onion, and tomatoes finely. Set aside the pork belly and keep it at room temperature for a while to ensure it cooks evenly. Now that we've adequately prepped everything, we can move on to the cooking process.

2: Searing the Lechon Kawali
Let's kick off the cooking extravaganza by preparing the Lechon Kawali. Heat the vegetable oil in a deep pan over medium heat. Carefully place the pork belly into the pan, making sure it's fully submerged in the hot oil. Allow it to cook for about 15-20 minutes or until the skin turns golden brown and crispy. While the Lechon Kawali is sizzling away, you can move on to the next step.

3: Sauteing the Aromatics
Time to infuse our dish with aromatic goodness! In the same pan as the Lechon Kawali, add the chopped garlic and onions. Saute them until they turn translucent and release their delightful fragrance. Next, toss in the finely chopped tomatoes and stir-fry them until they soften and create a beautiful base for the Pinakbet.

4: Flavorful Sauce Assembly
To create a sauce that will elevate our Pinakbet, add 2 tablespoons of bagoong alamang to the pan. This fermented shrimp paste brings a burst of umami flavor to the dish, taking it to a whole new level. Stir the bagoong alamang into the sauteed aromatics, letting its distinct taste infuse with the mixture. Now, it's time to add the finishing touch to the sauce.

5: Cooking the Vegetables
With the sauce simmering away, it's time to add the vegetables. Start by pouring 2 cups of water into the pan and letting it come to a gentle boil. Once the water is simmering, carefully place the kalabasa, okra, eggplant, and sitaw into the pan. Ensure that the vegetables are evenly distributed, allowing them to cook in the flavorsome sauce. Cover the pan and let the Pinakbet cook for about 8-10 minutes until the vegetables are tender yet firm.

6: Combining the Lechon Kawali and Pinakbet
Picture this: the rich, golden-brown Lechon Kawali resting on top of a vibrant medley of vegetables. It's time to merge the two delightful components into one harmonious dish! Gently place the crispy Lechon Kawali on top of the cooked Pinakbet. The skin should remain crisp, and the succulent pork belly will release its juiciness, adding depth to the already tantalizing flavors of this dish.

7: Serving and Presentation
As they say, you eat with your eyes first. Let's ensure our Pinakbet with Lechon Kawali looks as tempting as it tastes. Arrange the colorful medley of vegetables on a large serving dish, creating a bed for the golden Lechon Kawali to rest upon. Ensure that each portion has a generous share of vegetables and a heavenly slice of crispy pork belly. And voila! You have yourself an impressive and delicious Filipino feast.

8: Pairing Suggestions
To complement the robust flavors of Pinakbet with Lechon Kawali, it's wise to pair it with steamed rice. The fluffy rice will absorb the savory sauces, bringing out the dish's full range of tastes. If you're feeling adventurous, you can also savor this culinary masterpiece with some pickled vegetables on the side, such as atchara (pickled papaya) or bagoong (fermented shrimp paste) to further enhance the experience.

9: Leftover Ideas
If you somehow find yourself with leftovers, fret not! Pinakbet with Lechon Kawali can be just as delightful the next day. You can enjoy it as is or repurpose it by removing the crispy Lechon Kawali's skin and shredding the meat. Use it as a filling for delectable sandwiches or toss it into a fried rice for a flavorsome twist.

10: Conclusion
Congratulations! You've just completed your journey through the world of Pinakbet with Lechon Kawali. This striking dish brings together the best of Filipino cuisine—succulent pork belly, vibrant vegetables, and a myriad of flavors that will leave you craving for more. So, next time you're in the mood for a hearty and fulfilling meal, consider giving this recipe a try. Your taste buds will thank you!

Thursday, September 21, 2023

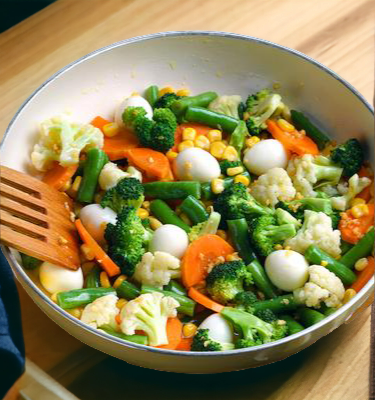
The Buttered Vegetables Delight: A Guide to Cooking a Mouthwatering and Nutritious Dish


Enjoy a burst of vibrant colors and flavors with our Buttered Vegetables recipe. Learn how to cook this delightful dish, using fresh ingredients like carrot, soybean, broccoli florets, and more. With the rich taste of butter and the addition of quail eggs, this simple recipe will elevate your culinary skills and impress your guests. Dive into our step-by-step guide and unlock the secrets to creating a mouthwatering and nutritious dish that will leave your taste buds begging for more.

Welcome, food enthusiasts and aspiring chefs! Today, we're diving into the world of delicious and healthy cooking with a delightful dish: Buttered Vegetables. This simple yet flavorful recipe allows you to savor a medley of vibrant vegetables, enhanced by the rich taste of butter. If you're ready to tantalize your taste buds and add a burst of color to your plate, let's jump right into this appetizing culinary adventure!

1: Gathering the Ingredients
To get started on your Buttered Vegetables dish, you'll need to assemble the following ingredients: 4 cloves of garlic, 3 tablespoons of butter, 0.75 cup each of carrot, raw green soybean, broccoli florets, cauliflower, and corn grain, as well as 12 quail eggs. These ingredients come together to create a harmonious blend of flavors and textures that will leave you craving for more.

2: Preparing the Vegetables
Begin by prepping the vegetables. Peel and mince the garlic cloves, and set them aside. Next, wash and chop the carrot, raw green soybean, broccoli florets, cauliflower, and set these aside as well. Rinse the corn grain, and if using fresh corn, carefully remove the kernels from the cob. Lastly, hard-boil the quail eggs, peel them gently, and keep them ready to add a delightful touch to our buttered vegetables.

3: Sautéing the Garlic
Heat a large skillet over medium heat and melt the butter. Once the butter has melted and sizzles gently, add the minced garlic to the skillet. Sauté the garlic for a minute or until it becomes fragrant, being careful not to let it burn.

4: Savoring the Aroma
As the delightful aroma of garlic fills the air, take a moment to appreciate the tantalizing scent wafting from your skillet. The combination of garlic and butter creates a heavenly fragrance that will make your kitchen feel like a gourmet restaurant.

5: Adding the Vegetables
Now comes the exciting part! It's time to bring in the vibrant vegetables. Toss the chopped carrot, raw green soybean, broccoli florets, cauliflower, and corn grain into the skillet with the sautéed garlic. Stir gently, ensuring the vegetables are evenly coated with the butter and garlic mixture.

6: Embracing the Sizzle
As the vegetables make contact with the hot skillet, you'll hear the satisfying sizzle. This cooking sound signals that the flavors are starting to develop, and the vegetables are beginning to soften while maintaining a slight crunch. Keep stirring occasionally to evenly cook the vegetables.

7: Balancing the Texture
One of the charms of Buttered Vegetables lies in the balance of textures. The carrots offer a snappy bite, the raw green soybean brings a soft crunch, and the broccoli florets and cauliflower provide a gentle tenderness. Meanwhile, the corn grain adds a burst of juiciness, elevating the overall mouthfeel and creating a pleasing contrast.

8: Introducing the Quail Eggs
At this stage, let's introduce the star of the show: the quail eggs. Gently place the peeled quail eggs into the skillet, taking care not to break them. These miniature eggs add a touch of elegance and a unique flavor to the dish, making it truly stand out. The quail eggs also pack a protein punch, increasing the nutritional value of your Buttered Vegetables.

9: Cooking to Perfection
Continue cooking the mixture of vegetables and quail eggs for a few more minutes, allowing the eggs to warm through and the flavors to mingle. Be mindful not to overcook the vegetables; they should retain their vibrant colors and maintain a slight crunch, contributing to the visual appeal and delightful experience of the dish.

10: Savoring the Buttered Vegetables
Congratulations! You've successfully cooked a savory and colorful platter of Buttered Vegetables. Transfer the dish to a serving plate, and be prepared to dig into a feast for both your eyes and your taste buds. With each bite, relish the harmonious combination of flavors, the buttery richness, and the delightful textures. Don't forget to share this delicious dish with friends and family, extending the joy of your culinary creation.


Tuesday, September 19, 2023

The Ultimate Guide: Cooking Ilocos Lauya like a Pro


Learn how to cook Ilocos Lauya, a flavorful Filipino dish made with tender pork pata, aromatic spices, and fresh vegetables. Follow this step-by-step guide to master the art of cooking Ilocos Lauya in your own kitchen!


Welcome to our kitchen, where we take pride in sharing beloved Filipino recipes that evoke nostalgia and create delicious memories. In this article, we'll dive into the world of Ilocos Lauya, a classic dish from the Ilocano region of the Philippines. With its tender pork pata, aromatic spices, and fresh vegetables, Ilocos Lauya is a culinary delight worth exploring. So, grab your apron, gather your ingredients, and let's get cookin'!

1: Prep Work – Gather Your Ingredients
Before we start cooking our Ilocos Lauya, let's gather the necessary ingredients to bring out its authentic flavors. For this recipe, you will need the following:
- 1 kg Pork Pata
- 6 cups Water
- 3 tbsp White Vinegar
- 2 pcs Bay Leaf
- 1 tsp Peppercorn
- 8 cloves Toasted Garlic
- 2 pcs Onion
- 2 tbsp Patis
- 2 cups Cabbage

2: Marinating the Pork Pata
To infuse the pork pata with delightful flavors, we need to marinate it. In a large bowl, combine the pork pata, white vinegar, and patis. Mix well, ensuring each piece is coated with the marinade. Let the pork rest for at least 30 minutes, allowing the flavors to penetrate the meat.

3: Cooking the Pork Pata
In a large pot, heat some cooking oil over medium heat. Add the marinated pork pata and cook until lightly browned. This caramelization adds depth to the dish. Once the pork is nicely seared, pour in the water and bring it to a boil. Reduce the heat and let it simmer for about 1 to 2 hours or until the meat is tender.

4: Infusing Flavors – Spices and Aromatics
To enhance the taste of your Ilocos Lauya, we'll add some spices and aromatics. Toss in the bay leaves, peppercorns, toasted garlic, and sliced onions into the pot. These ingredients will elevate the dish to new heights, providing a tantalizing aroma that will whet your appetite.

5: Simmering to Perfection
Cover the pot and let the Ilocos Lauya simmer on low heat for another 30 minutes. This slow cooking process allows the flavors to meld together, transforming simple ingredients into a mouthwatering masterpiece. Stir occasionally to prevent the ingredients from sticking to the bottom of the pot.

6: Adding the Finishing Touches – Fresh Cabbage
As we near the finale of our Ilocos Lauya, it's time to introduce the final ingredient – fresh cabbage. Chop the cabbage into bite-sized pieces and add it to the simmering pot. The cabbage will infuse its natural sweetness and provide a vibrant splash of color to the dish. Let it cook for an additional 5 to 10 minutes until the cabbage is tender.

7: Serve and Enjoy!
Congratulations! You have successfully cooked Ilocos Lauya. Transfer the steaming hot soup into a serving bowl, making sure to include generous portions of pork pata, vegetables, and flavorful broth. Accompany your Ilocos Lauya with steamed rice, and don't be shy to savor every spoonful. Gather your loved ones and cherish this comforting Filipino dish together.

8: Tips and Variations
- For an added kick, you can add chili peppers or chili powder to your Ilocos Lauya.
- Experiment with different vegetables like bok choy or green beans to suit your taste preferences.
- Leftover Ilocos Lauya can be stored in the refrigerator for up to 3 days. Simply reheat it on the stove or microwave when you're ready to enjoy another serving.

9: Share Your Experience
We would love to hear about your Ilocos Lauya cooking adventure! Tag us on social media with your creations and share your experience with the world. Remember, cooking is all about creativity and adding your personal touch.

10: Conclusion
Cooking Ilocos Lauya is an enriching experience that allows you to explore the flavors of the Philippines. With its tender pork pata, aromatic spices, and the freshness of cabbage, this dish raises the bar for comfort food. We hope this step-by-step guide has inspired you to embark on your own culinary journey and create memories while savoring the delightful taste of Ilocos Lauya.


Monday, September 4, 2023

A Sizzling Guide to Cooking Irresistible Pork Tapa at Home


Craving for a flavorful Filipino breakfast? Learn how to cook tender and savory Pork Tapa with this easy-to-follow recipe. Discover the secret ingredients and steps to create a mouthwatering dish that will make your taste buds dance with joy!

Introduction:

Are you tired of mundane breakfast options? Spice up your mornings with a delicious plate of homemade Pork Tapa! With just a few simple ingredients and some basic cooking skills, you can recreate the mouthwatering flavors of this Filipino favorite right in your own kitchen. In this guide, we'll walk you through the steps of making tender, succulent Pork Tapa that will leave you craving for more. Get ready to embark on a flavor journey that will elevate your breakfast game to a whole new level!

1: Gathering the Ingredients

To begin this culinary adventure, gather the following key ingredients for your Pork Tapa recipe:

- 0.5 kg Pork Shoulder
- 2 tbsp Soy Sauce
- 0.25 tsp Ground Pepper
- 4 cloves Garlic
- 2 tbsp Brown Sugar
- 1 pc Hot Chili Peppers
- 2 tbsp Vegetable Oil
- 0.25 cup Spiced Vinegar

2: Preparing the Marinade

Now that you have the ingredients ready, let's dive into creating the mouthwatering marinade for your Pork Tapa. Start by mincing four cloves of garlic and finely chopping the hot chili peppers. These ingredients will add a delightful kick of flavor to your dish. Mix the minced garlic, chopped chili peppers, soy sauce, ground pepper, and brown sugar in a bowl. Give it a good stir until the sugar has dissolved and the marinade is well combined.

3: Marinating the Pork

Take the pork shoulder and slice it thinly against the grain. Thin slices ensure quick and even cooking while maintaining the tenderness of the meat. Transfer the pork slices to a shallow dish or a Ziploc bag. Pour the prepared marinade over the pork, ensuring that each slice is thoroughly coated. For optimum flavor infusion, refrigerate the marinated pork for at least 2 hours, or even overnight if you have the time. This will allow the meat to absorb the flavors, resulting in the perfect combination of sweet, savory, and tangy notes.

4: Cooking the Tapa

After marinating the pork, it's time to cook it to perfection. Heat two tablespoons of vegetable oil in a large skillet over medium-high heat. Once the oil is hot, carefully place the marinated pork slices in a single layer, making sure not to overcrowd the pan. Frying the pork in batches is essential to achieving that delicious caramelization and a beautiful golden brown color.

Let the pork slices cook for about 2-3 minutes on each side, until they develop a slightly charred exterior and are cooked through. The exact cooking time may vary depending on the thickness of the slices. Remember, we want juicy and tender pork, so be careful not to overcook them. Overcooking may result in tough and dry tapa.

5: Sizzling Serving Suggestions

Once the Pork Tapa is cooked to perfection, it's time to savor the mouthwatering results of your labor. Serve the tapa hot with steamed rice, sunny-side-up eggs, and a side of spiced vinegar. The combination of flavors will leave your taste buds dancing with delight. For an extra touch of authenticity, you can garnish your tapa with a sprinkle of chopped scallions or toasted garlic flakes.

If you're feeling adventurous, you can also experiment with other traditional Filipino breakfast accompaniments. Try pairing your tapa with a side of fluffy garlic fried rice, atchara (pickled papaya), or even a refreshing tomato and onion salad. The possibilities are endless, and you can mix and match according to your preferences.

6: Storing Leftover Tapa

Sometimes you end up with more tapa than you can finish in one sitting. Don't worry; you can store the leftover tapa for future cravings. Allow the cooked pork to cool completely before transferring it to an airtight container. Refrigerate the tapa, and it will stay good for up to three days. To reheat, simply pan-fry the tapa slices for a few minutes until heated through. Remember, freshly cooked tapa always tastes the best, so try to consume it within a few days for the ultimate flavor experience.

7: Personalizing Your Tapa

While this recipe provides a classic and flavorful approach to Pork Tapa, feel free to get creative and put your own spin on it. You can experiment with additional ingredients to tailor the taste according to your preferences. For instance, if you prefer a touch of sweetness, consider adding a drizzle of honey or a tablespoon of pineapple juice to the marinade. Similarly, if you enjoy a smoky taste, a teaspoon of liquid smoke can do wonders. Don't be afraid to venture into your culinary playground and explore the endless possibilities of enhancing this traditional Filipino dish.

8: Exploring Variations

In addition to the traditional Pork Tapa, the Philippines offers a host of other tapa variations that are equally delightful. If pork isn't your preferred choice of protein, you can easily substitute it with beef or chicken. Beef Tapa, made with thinly sliced beef sirloin, offers a heartier and bolder flavor profile. On the other hand, Chicken Tapa provides a healthier alternative without compromising on taste.

9: Sharing the Joy of Pork Tapa

Pork Tapa is a dish that brings joy and satisfaction to the table, making it a perfect candidate for gatherings and celebrations. Organize a breakfast fiesta with friends and family, where everyone can enjoy the delightful combination of flavors that Pork Tapa offers. You can even turn it into a challenge by hosting a cook-off, encouraging everyone to put their unique twists on this beloved Filipino dish. Remember, food tastes even better when shared, so spread the love and happiness that Pork Tapa brings!

10: Conclusion

Congratulations! You've mastered the art of cooking Pork Tapa like a pro. Through the careful selection of ingredients, the marinating process, and the perfect execution of the cooking techniques, you've created a mouthwatering dish that's sure to impress. From lazy weekend breakfasts to special family gatherings, Pork Tapa will undoubtedly become a favorite addition to your culinary repertoire. So, grab your apron, fire up the stove, and indulge in the flavors and aromas of this delectable Filipino delight.


Sunday, September 3, 2023

Flavorsome Fare: Mastering the Art of Asian Stir-Fry

Master the art of Asian stir-fry with this easy-to-follow and flavorful recipe. Sizzle your way to culinary bliss with tender sirloin steak, vibrant vegetables, and a lip-smacking sauce. Get ready to tantalize your taste buds with this Asian-inspired sensation in a single skillet!
Introduction:

Asian stir-fry is a delightful culinary creation that combines vibrant veggies, tender meats, and tantalizing sauces. Bursting with flavors and textures, this versatile dish promises a fusion of Eastern delights that will transport your taste buds. Whether you're a novice in the kitchen or a seasoned chef, our informal guide will help you whip up a sizzling Asian stir-fry that will leave everyone craving for more.

1: Gather Your Ingredients

Before diving into the world of Asian stir-fry, it's crucial to have all the essentials on hand. For this recipe, ensure you have the following ingredients: 1 lb. sirloin steak, cut into thin strips, 1 tsp. grated fresh ginger or 1 tsp. ground ginger, 1 bag (16 oz.) frozen stir-fry vegetables (thawed), 1 1/4 cups water, 1 Tbsp. soy sauce, and 1 Tbsp. rice wine or white wine vinegar.

2: The Secret to Tender Steak

The star of any Asian stir-fry is undoubtedly the succulent steak. To achieve tender beef, it's vital to slice it against the grain. This technique breaks up the muscle fibers, resulting in melt-in-your-mouth goodness. Remember, thin strips of sirloin steak are ideal for stir-frying. So, grab your sharpest knife and slice away!

3: Elevate with Fresh Ginger

Ginger, whether ground or freshly grated, adds a zesty kick to your stir-fry. Its warm and tangy flavors enhance the overall taste profile. For a bolder taste, opt for fresh ginger, but if you don't have it on hand, ground ginger is an excellent substitute.

4: Preparation is Key

To achieve a stir-fry that sings with flavors, proper preparation is crucial. Thaw the frozen stir-fry vegetables and pat them dry to avoid excess moisture during cooking. Similarly, ensure your cutting board and knives are clean and in good condition. Chopping the vegetables into uniform sizes promotes even cooking and adds visual appeal.

5: Quick and Easy Cooking

The essence of stir-frying lies in its swift and high-heat cooking method. Begin by heating a tablespoon of oil in a large skillet or wok over medium-high heat. Once sizzling hot, add the steak and ginger, allowing it to brown for a minute or two before flipping the meat. The high heat ensures a beautiful caramelization, sealing in all those delicious flavors.

6: The Veggie Melange

After the steak is cooked to your desired doneness, it's time to introduce the star supporting cast: the stir-fry vegetables. Toss in the thawed vegetables and let them cook alongside the beef for a couple of minutes, ensuring they maintain their crispness. Remember to stir continuously, allowing the flavors to mingle and dance together

7: Whip Up a Savory Sauce

No Asian stir-fry would be complete without a delectable sauce. In a small bowl, combine the water, soy sauce, and rice wine or white wine vinegar. This blend of savory and tangy notes will elevate your stir-fry to new heights. Once combined, pour the sauce over the stir-fry, allowing it to coat every morsel with its umami goodness.

8: The Perfect Finish

Continue cooking the stir-fry for another few minutes until the vegetables are tender but still vibrant. Be sure not to overcook them as their crunch adds a delightful texture to the dish. Give it a taste and adjust the seasoning if needed, adding more soy sauce or a hint of spice, if desired.

9: Serving Suggestions

Asian stir-fry is a versatile dish that pairs well with a myriad of accompaniments. Serve it over a bed of steamed rice or noodles, or try it alongside fluffy jasmine rice for a fragrant combination. Garnish your creation with chopped green onions or cilantro for a burst of freshness and color.

10: Dive into the Delight

With your Asian stir-fry masterpiece ready to be devoured, gather your loved ones around the table and enjoy the symphony of flavors. Let the aromas transport you to the bustling streets of Asia and savor each bite of this harmonious dish.


Saturday, September 2, 2023

Seafood and Lime Sinigang: A Tangy Twist to Your Taste Buds


Indulge in the tantalizing flavors of Seafood and Lime Sinigang, a zesty twist to the classic Filipino dish. This vibrant recipe brings together succulent seafood, tangy lime, and fresh vegetables in a rich and comforting broth. Discover the steps to create this delightful dish, from preparing the flavorful base to incorporating the Sinigang mix, and add a burst of excitement to your next culinary adventure. Get ready to dive into the flavors that will leave you craving for more!

Get ready to tantalize your taste buds with an explosion of flavors in this sea-inspired recipe of Seafood and Lime Sinigang. This Filipino classic takes a zesty twist with the addition of lime, adding a burst of tanginess to the familiar depths of sinigang. The combination of succulent seafood, fresh vegetables, and the distinctive sourness of samapalok creates a symphony of flavors that will leave you craving for more. So put on your apron and get ready to dive into the culinary adventure of Seafood and Lime Sinigang!

1: Gathering the Ingredients
To make this delicious Seafood and Lime Sinigang, you will need the following ingredients:

- 4 cups rice washing (hugas bigas)
- 3 pcs onions, quartered
- 4 pcs native tomatoes, quartered
- 2 pcs fresh long green chilis
- 1⁄4 kg. mussels, cleaned
- 1⁄4 kg. shrimp, trimmed and cleaned
- 2 pcs. squid, small, cleaned, cut into rings
- Juice from 1 pc. of lime
- 1 pack Sinigang sa Sampalok 2-in-1 Mix
- 4 pcs okra, sliced into half
- 1/2 bunch kangkong, sliced into 2-inch lengths

Now that you have all the ingredients ready, it's time to jump into the cooking process.

2: Preparing the Flavorful Base
Start by heating a large pot over medium heat. No need to be shy with the flames here; we want some good old sizzling action. Once the pot is hot, add a drizzle of oil and toss in the quartered onions. Let them sizzle away until they become fragrant and slightly golden brown. 

Next, add the quartered tomatoes for a burst of natural sweetness. Stir them around the pot, watching as their vibrant colors start to intensify and release their juices. This will form the base of your sinigang's rich flavor.

3: The Seafood Medley
Now it's time to introduce the stars of the show - the seafood! Add the cleaned mussels, trimmed and cleaned shrimp, and the delightfully tender squid rings into the pot. Watch as they gracefully dance around in the flavorful broth, absorbing the essence of the onions and tomatoes.

As they cook, the seafood will release their own juices, further enhancing the depth of flavors. Don't forget to squeeze in the refreshing juice from the lime. This zesty addition will lift the dish to new heights, creating a lively symphony of flavors.

4: Infusing the Sinigang Mix
To complete the sinigang experience, it's time to introduce the Sinigang sa Sampalok 2-in-1 Mix. This handy pack combines the tanginess of sampalok (tamarind) with other savory spices, making it the secret ingredient in creating the authentic sinigang taste.

Sprinkle the contents of the Sinigang Mix into the pot, stirring well to ensure it is fully dissolved. As the sinigang mix dissolves, it will infuse the broth with its signature sourness, balancing the sweetness of the tomatoes and highlighting the flavors of the seafood.

5: Vegetables Take the Stage
No sinigang is complete without a generous medley of vegetables. Add the sliced okra and kangkong into the pot, allowing them to join the seafood party. These vegetables not only provide vibrant colors to the dish but also add a delightful texture and a fresh, earthy taste.

Cover the pot, allowing the sinigang to simmer and allow the flavors to meld together. Resist the temptation to peek too often – the sinigang needs time for the magic to happen!

6: A Burst of Lime Infusion
Just when you thought the lime had done its job by adding zing to the broth, we have a delightful surprise for you! Cut a few lime slices and gently squeeze them over the simmering sinigang. This extra burst of lime infuses the sinigang with a vibrant citrus aroma that will awaken your senses.

7: The Aroma Unleashed
As the Seafood and Lime Sinigang slowly cooks away, the tantalizing aroma fills your kitchen, teasing your taste buds and awakening your appetite. The scent of tangy tomatoes, mixed with the sweetness of onions and the freshness of seafood, creates a symphony that is absolutely irresistible.

8: Serving it Up
After patiently waiting and inhaling the irresistible aroma, it's time to enjoy the fruits of your labor. Ladle steaming bowls of Seafood and Lime Sinigang, ensuring each bowl is generously filled with the bountiful seafood, vibrant vegetables, and tangy broth. 

Serve it alongside a bowl of steaming white rice, allowing the Sinigang to blend its flavors with the comforting staple. The vibrant colors of the dish will entice your eyes, while the harmonious blend of flavors will keep you coming back for more.

9: A Twist on Tradition
Seafood and Lime Sinigang puts a creative twist on the traditional sinigang recipe. The addition of lime introduces a zesty punch that elevates this beloved Filipino comfort food to new heights. It's a surprising combination that adds a unique dimension to the familiar flavors, making it a dish worth savoring.

10: Dive Into Sinigang Bliss
So, what are you waiting for? Take a culinary plunge into the depths of Seafood and Lime Sinigang. Let the tangy explosion of flavors wash over your taste buds and transport you to a world of gastronomic bliss. From the succulence of seafood to the lively zest of lime, every spoonful is a journey.


Friday, September 1, 2023

Cooking Beef Sinigang with Gabi: A Hearty Filipino Delight


Learn how to prepare a flavorsome bowl of Beef Sinigang with Gabi, an authentic Filipino dish made with succulent beef shanks and taro roots. This easy-to-follow recipe will make your taste buds dance with joy as you savor the tangy and comforting flavors of this iconic soup. Get ready to embark on a culinary adventure with this step-by-step guide!

1: Introduction
Welcome to the tantalizing world of Filipino cuisine! In this blog post, we're going to explore the art of cooking Beef Sinigang with Gabi. This dish is a classic favorite among Filipinos, and it's not hard to see why. The combination of tender beef shanks, tangy tamarind soup, and the earthy flavor of taro roots creates a harmonious burst of flavors that will leave you craving for more. So, put on your apron, sharpen those knives, and let's dive into this delightful culinary journey!

2: Gathering Your Ingredients
Before we start cooking, let's gather all the ingredients needed to create this mouthwatering Beef Sinigang with Gabi. You will need 0.5 kg of beef shank, 6 cups of water, 1 pc of onion, 2 pcs of tomato, 1 pc of finger chili, 2 pcs of Gabi (taro root), 1 pc of eggplant, 2 pcs of sitaw (yard-long beans), 1 package of Sinigang Sampalok With Gabi Mix, 1 tbsp of patis (fish sauce), and 1 cup of kangkong (water spinach). With these fresh and flavorful ingredients in hand, we're all set to embark on our cooking adventure.

3: Preparing the Ingredients
To ensure a flavorful and authentic Beef Sinigang with Gabi, it's essential to prepare the ingredients properly. Start by washing the beef shank thoroughly under cold water to remove any impurities. Cut it into smaller, bite-sized pieces, allowing it to cook evenly. Dice the onion and tomatoes into small chunks, chop the finger chili, and peel the taro roots before cutting them into cubes. Don't forget to slice the eggplant and yard-long beans into around 2-inch pieces. Lastly, separate the kangkong leaves from the stems. With all the ingredients prepped and ready, we can now move on to the next step.

4: Sautéing the Aromatics
In a large pot, heat some oil over medium heat. Add the diced onions and sauté until they turn translucent and fragrant. This step releases the aromatic flavors of the onion and sets the foundation for our Beef Sinigang with Gabi. Once the onions have softened, add the chopped tomatoes and finger chili. Continue sautéing until the tomatoes begin to break down and release their juices. The combination of onions, tomatoes, and chili creates a flavorsome base for our Sinigang soup.

5: Adding the Beef and Water
Now, it's time to add the star of our dish – the beef shanks. Carefully place the beef into the pot, allowing it to brown on all sides. This browning process adds depth and richness to the soup. Once the beef is nicely seared, pour in the 6 cups of water. The water will help create the savory and delicious broth that makes Beef Sinigang so irresistible. Give it a gentle stir, ensuring the beef and vegetables are submerged. Bring the mixture to a boil.

6: Simmering to Perfection
Once the Beef Sinigang with Gabi has reached a rolling boil, reduce the heat to a simmer. Cover the pot and let it cook slowly for about an hour. This slow and gentle simmer allows the flavors of the beef and vegetables to mingle and intensify. Make sure to check on the pot occasionally, giving it a gentle stir and skimming off any impurities that rise to the surface. As the hours pass, your kitchen will be filled with the irresistible aroma of this traditional Filipino dish.

7: Adding the Taro Roots and Vegetables
After an hour of simmering, it's time to introduce the Gabi (taro roots) and the remaining vegetables into our bubbling pot of goodness. Gently place the taro roots into the pot, ensuring they are surrounded by the flavorful broth. Allow them to cook for about 15 minutes until they become tender and contribute their unique earthiness to the broth. Next, add the sliced eggplant and yard-long beans, letting them soak up the flavors of the soup. Continue simmering until the vegetables are cooked but still retain their vibrant colors and crunch.

8: Balancing the Flavors
To enhance the tangy and savory taste of our Beef Sinigang with Gabi, it's time to introduce the Sinigang Sampalok With Gabi Mix. This packet of magic contains a blend of tamarind and taro flavors that will elevate your dish to new heights. Gradually add the Sinigang mix, stirring gently to incorporate it into the simmering broth. Taste the soup and adjust the seasoning according to your preference. For that extra zing, drizzle a tablespoon of patis (fish sauce) into the pot. The fish sauce adds a delicious umami flavor that perfectly complements the dish.

9: Finishing Touches
As we near the completion of our Beef Sinigang with Gabi, it's time to add the final element – the fresh green goodness of kangkong. Throw in the kangkong leaves and allow them to wilt gently in the hot soup. This adds a pop of vibrant color and a refreshing taste to the dish. Let the soup simmer for a few more minutes to ensure all the flavors meld together harmoniously.

10: Serving and Enjoying
Finally, the moment we've been waiting for – it's time to ladle out the piping hot Beef Sinigang with Gabi into bowls. Serve this traditional Filipino delight with steamed rice on the side to complete the experience. Don't forget to pair it with a tangy calamansi (Philippine lime) dip for an extra kick of flavor. The tender beef, the exotic taste of taro roots, and the burst of tang from the tamarind soup will transport your taste buds to the bustling streets of the Philippines. Enjoy this hearty and comforting dish with your loved ones!